


|
|
|
by Nick Berry So, you want to rebuild your 700-R4 transmission. Well ya gotta have patience and ya gotta have time. If you are afraid to rebuild a carburetor or get frustrated easily then don't even think about that transmission. If you think this is something you can do in a weekend - forget it! While automatic transmissions are actually simple in operation they have a LOT of parts inside and there is little room for error when rebuilding one. If, however, you have the time, patience and have wrenched on most everything else automotive you should be able to successfully rebuild your transmission. This is not a step-by-step tutorial, but rather a collection of tips and information so you can do it too. I have rebuilt three automatics, two 200-4Rs and my 700-R4. Rebuilding these transmissions has not made me an expert but I have learned enough and discovered enough resources to help any competent home mechanic be successful in this project. The first thing in any project is to educate yourself. There are two books I recommend are:
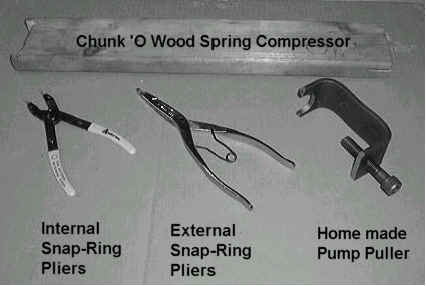
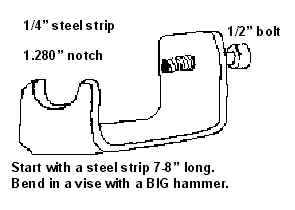
OK, still with me? If you are rebuilding your existing transmission, read on. If you are upgrading yourvehicle to use the 700, then it MUST match your engine type. A V-8 engine needs a 700 which was originally behind a V-8. If you have a V-8 and someone GIVES you a 700 from a V-6 vehicle, don't bother. There are too many internal differences. Now you need the parts to do the rebuild. First there is the rebuild kit itself. This is all the new gaskets and seals, clutch plates and assorted small parts. I recommend the TRANSTAR kit sold by Northern Auto Parts. It is very complete, even including a full set of bushings, thrust washers and a new filter. Now comes the secret ingredient. You are no doubt aware that the 700-R4 had its share of problems and the early ones had a horrible reputation for failure. Any rebuild is doomed to subsequent failure unless the base problems are corrected. Many rebuilders have their own little tricks they use to make the 700 a solid unit. There are some simple modifications you can make yourself (check out the link to The Drive Train Page) or you can buy a "shift improver kit" which provides the tricks in one package. The one I went with is the TRANSGO SysKoKal Kit (System Correction and Calibration) also available from Northern Auto Parts. This kit is often referred to by the pros as the "Gil Younger Kit" and is very integrated, covering changes to nearly the entire valve body assembly. Mr. Younger and his staff have specialized in finding and fixing the problems in automatics for many years and this kit is designed for the transmission specialist (they make a consumer kit with a video tape as well but the cost is almost triple). The instructions in this kit also require careful study since it assumes you are experienced working on transmissions. There are several parts you may wish to update, particularly if your 700 will see hard service. The Rear Ring Gear is highly recommended for replacement in any 700. The new versions are heat treated and much stronger. If the old one (already weak from age and use) lets go it will cause MAJOR damage. If your 700 is an '82 to early '86 model, the Low-Reverse Planetary gearset which fits into the Rear Support lacked proper lubrication. A redesigned gearset corrects this and ensures a long life for the planetary gears. I had to replace the Low/Reverse Sprag in my 700 and while GM makes a wider, heavy-duty version, I stayed with a stock one for my application. The front Input Sprag is another option for update, again with a wider version available. The 3-4 Clutch Pack is an item of debate among rebuilders. The stock V-8 pack has 6 friction plates and there are aftermarket packs with 8 or even 9 friction plates in them. To achieve this the plates are thinner. The Gil Younger kit recommends these denser clutch pack, however, GM contends that thicker (stock) plates can dissipate heat better and resist warping. I flipped a coin and saved some money by staying with the stock setup. The last update is another Gil Younger/TRANSGO product. It is the "No Yo-Yo" Pump kit. It contains a spring and two new hardened pump rings. Highly recommended and inexpensive. Check the plastic drive gear on the end of the Governor. Unless yours has very low miles it will need replacement. The ATSG manual mentions replacing the Accumulator Pistons and Seals with a new style. This information is outdated. The pistons have been discontinued and your kit will have new style seals which work in the old pistons. Lastly, you will need a new (rebuilt) torque converter. I purchased mine from a local transmission parts house. You need to tell them if you have an early 700 with the 27-spline input shaft or the later 30-spline. And whether gas or diesel engine. I recommend you find a shop that rebuilds their own or uses a reputable supplier. I originally purchased an "RPM" brand converter that was rebuilt in Mexico and it was junk. It shredded the lock-up clutch within 5000 miles and caused many headaches and another rebuild. You may need some other parts as well depending on what you find inside you tranny. Mine had a popped off snap ring inside the input drum and the groove the snap ring fit into was damaged. I had to replace the complete Input Shaft and Drum as they are one piece. I bought a good used one from a local tranny shop for only $30. Don't reach for your tools yet because you may need a couple of special ones. The first one is the pump puller. It is possible that you could remove the pump without it but you may damage things too. I am a machinist so I made my own and have included a dimensional drawing if you have the ability to make your own. You also need a set of bushing drivers. You can either buy a premade set or if you have access to a lathe and some round steel bar stock, you can turn your own. Next you need two types of snap ring pliers. Internal ones with straight "pin" tips and external ones with flat tips (see photo). There are two spring assemblies that need to be compressed to remove and install an external snap ring. I simply used a 2 foot long 2X4 with a 1 inch deep notch cut in the end (see photo). The trans shops use a special tool in a hand press to compress the springs and perhaps you can improvise something better than a chunk of wood, but it worked for me. Another special tool which the rebuilding manuals show, is an expander and compressor for the Teflon seals on the input shaft. I improvised with a thin plastic tube slightly larger than the shaft. I stretched the seals over the tube and slid them into their grooves. They remain stretched out and need to be squeezed back to size. I then split the tube lengthwise and placed it over the seals and used two hose clamps over the tube to squeeze the seals down into their grooves. Once you read the manuals you'll understand what this all means. It is a bit tricky and if the seals are over-stretched or damaged they'll leak. If you cannot improvise a suitable solution, you would be better off to take the shaft and seals to a trans shop and let them do it. The last item is a little tool to get the rubber piston seals into their bores. The manuals show how to make one but I had a dental probe with a blunt end that worked well for me. The ATSG manual lists several other special tools and if you rebuilt trannys all day, every day they would be nice but they are not needed to get he job done. Other than that, a few metric sockets and a large, sturdy flat screwdriver should be all you need. Once you get the rebuild kit, check your bushing drivers to the various bushing sizes. There are many and each one must fit well. Too loose and you may damage the bushing driving it in. Too tight and the bushing will seize on the driver and you'll damage the bushing getting the driver out. There should be just a slight amount of "wiggle" (.003" - .007") between the bushing and driver. A premade set may not have all the sizes you'll need so you will need to have them made up or decide to simply leave in the old ones if they are in otherwise good shape. I replaced all of mine but it might be better to leave in some of the old ones if you don't have the proper drivers than to damage new ones putting them in. The large front bushing (in the pump) and the rear bushing (in the tail housing) should always be replaced. Next, go through the SysKoKal kit. It contains many small parts and springs. Leave them in their bags until you are ready to use them. Study the instructions carefully. Some things won't be clear until you actually have the transmission apart, but learn what you can. Several modifications vary depending on the type of parts found in your transmission so pay attention and don't get ahead of the plan. NOW you can go ahead and remove the transmission and begin disassembly. Once the pan, linkage, valve body and accumulators are out it is nice to have the tranny in a vertical position. I bolted a piece of angle iron to the top two bolts of the bellhousing and then straddled it between two sawhorses. Have a large clean bench handy (two more sawhorses with a piece of plywood and cardboard on top works well) to lay out all the parts on. Don't throw away anything yet just lay it out in the order you removed it. Clean each part one at a time placing it back in order. A plastic dishpan and low-odor kerosene makes an inexpensive parts wash. Don't bother cleaning the clutch plates as they will be replaced, but don't toss them out or mix them up as you'll need to refer to them for proper number and order. Reassembly is pretty straightforward. Again, just pay attention and don't be in a hurry. After the low-reverse clutch plates are placed in the case there is a strangely bent, somewhat U-shaped metal piece that goes in. It is the "low-reverse clutch support retainer spring" and both books have near useless pictures of how it fits in. Basically, it just lays on its side and when you put in the low-reverse roller clutch assembly it wedges against it. Take your time and look CLOSELY at the photo in the Haynes manual. The only other thing that needs special mention is if you are using the larger, updated front input sprag assembly. If so, you leave out the thrust washer that would otherwise be used with the standard, narrower sprag assembly. Everything else is just following the manuals and the instructions in the TRANSGO Kit. One thing to replace on every rebuild is the lockup solenoid. They do go out with age and can damage the conveter and ultimately the transmission too. Also, replace the TV cable with a NEW one. Your old one may appear fine but the self adjusting mechanism on these is critical to proper operation. Improper adjustment WILL cause burnup! A new one will adjust properly and it is one more thing you don't need to worry about. DO IT! Finally, there is the transmission fluid itself. You might want to consider using the new synthetic fluids. Your transmission will typically run cooler with the synthetics which means longer life. While the synthetic fluid is more expensive, it is not something you will be changing on a frequent basis. I will leave it for you to decide. If you think you are ready for this project I suggest you start by picking up the Haynes manual at a local parts store and read it thoroughly. If you STILL think you're ready to tackle it, THEN go ahead and order your parts. Rebuilding it yourself is a gamble. You could invest a bunch of time and money with no guarantee that it will even work when you're done. Its not a job for just anyone, but if you think you've got the stuff and are willing to risk it a bit then you'll be glad you did it yourself. If you decide its more than you want to get involved with, well, at least now you know enough to talk intelligently with the mechanic you take your transmission to and get it rebuilt the right way. ********** DISCLAIMER ********** Parts and Sources Northern Auto Parts 1-800-831-0884 Check local sources and the Internet for your "hard parts" (eg. Rear Ring
Gear, Forward Sprag, etc.) Local Sources An interesting place to visit on the Internet is The Drive Train Page. The fellow who runs it is a transmission specialist and has good information about transmissions in general and the 700-R4 in particular. This article was originally published in 1999 on www.TheDieselPage.com © 2001 Nicholas Berry
|